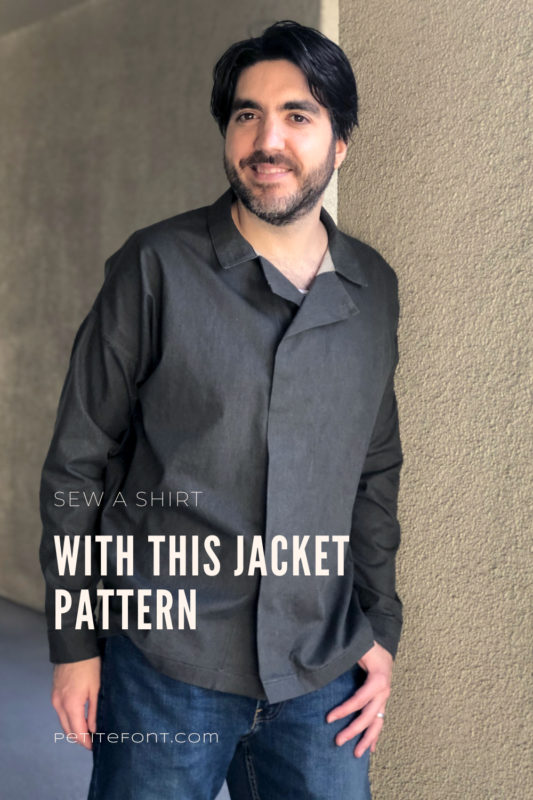
I turned the Ilford Jacket pattern into a shirt for my husband last month. It was
*Housekeeping: please note that I received this pattern for free as a member of the Sew My Style 2020 team. All opinions are my own.*
The Ilford Jacket is a very boxy unisex pattern, which means there is no shaping to it. This is why my husband got it instead of me. Remember my debacles with boxy shirts and jackets?
Here’s a review of those fails: Wiksten Haori, Uvita top, Elliot top, and the most egregious: Como Cardigan.
Boxy just isn’t for short squatty me. But the taller man I’m married to can pull it off just fine.
Sizing for the Ilford Jacket
The Ilford jacket pattern has a significant amount of ease. The difference between the finished measurements and size chart
So what do you do if you want to look like you’re wearing a tent? Size down selectively. Remember, sewing patterns are just starting points. Making them fit your specific anatomy is the art behind sewing!
Size Adjustments
I’d reached out to Chelsea at Friday Pattern Company to ask if I should alter the pattern in any way since I was making it for Ryan.
Those were good tips! I only half-listened when making the toile, though.
My husband’s chest measurement puts him in the XL category (42″). When I’m new to a pattern company I always print more than one size on the PDF. In this case, I printed the XL and L sizes (he’s a straight L in most men’s patterns). And once the PDF was put together it looked WAY too big for him.
Tissue fitting confirmed the obvious. It was just too much in that size.
I measured my TNT men’s shirt pattern against the Ilford jacket and found there were an extra 5″ (12.7 cm) inches on just the front alone! Even with my limited fitting experience, I knew that would be too much for my husband. So I proceeded to cut down all the pieces on the L line instead. This took 5/8″ (1.6-= cm) off each side, for a total of 2.5″ slimmer (6.4 cm) overall.
I also followed Chelsea’s directions and lengthened the body of the pattern. Using that same TNT pattern (McCall’s 7206) because it also has a straight hem, I added 3″ (7.6 cm) to the overall length.
This suits him WAY better!
But um, I forgot to do the sleeves. Actually, I didn’t forget. In my infinite laziness, I eyeballed them and thought they’d be fine. I usually have to shorten arms for him on patterns. I sometimes even have to alter store-bought shirts for him.
Being lazy caused me more work. Argh!
So don’t be like me. Measure the whole sleeve (cuff included!) to see if it’s long enough. The finished measurements are even given in the instructions! Turns out I needed to add an extra 2.5″ (6.4 cm) for it to fit properly. Oops.
I did end up doing a small bust adjustment (SBA) anyway, because the Ilford was really baggy along the front. I could only take out 1/2″ (1.3 cm) but that was enough to give a slight bit of shaping to the sides of the garment.
Adjusting the Facing
I didn’t like the way the cut-on facing finished the front of the Ilford Jacket. Instead, I got the super clever idea of adding a separate facing (again inspired by M7206). This would enclose all the front corners and give it a nice neat finish. Yay!
But then I messed that whole thing up! Instead of cutting off the existing extra 2″ (5 cm) of the cut-on facing, I just added a seam allowance and created a 2″ facing. I used up almost all my interfacing on it too!
And then I ended up with a facing that was too wide, that didn’t meet the collar and just looked stupid. But it did enclose those corners nicely.
So how did I fix it? In the laziest way possible! But in my defense, I was out of interfacing and didn’t want to go buy more, so I couldn’t cut new facing pieces. And I had already trimmed the corner down
Instead, I ripped out the stitching and then folded the entire facing over to meet the collar. This gave me back that extra 1/2″ on the front I took out with the SBA, which I didn’t need. And that nice finishing technique? It disappeared and I ended up hand tacking it down anyway. L’sigh.
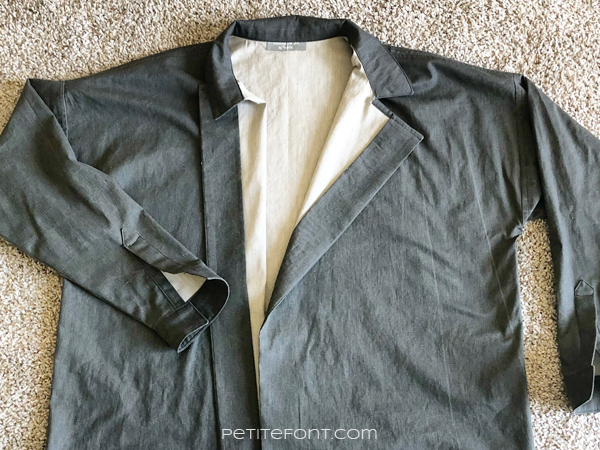
The one benefit of the facing was that I could add big snaps invisibly to it before sewing it down. Yay.
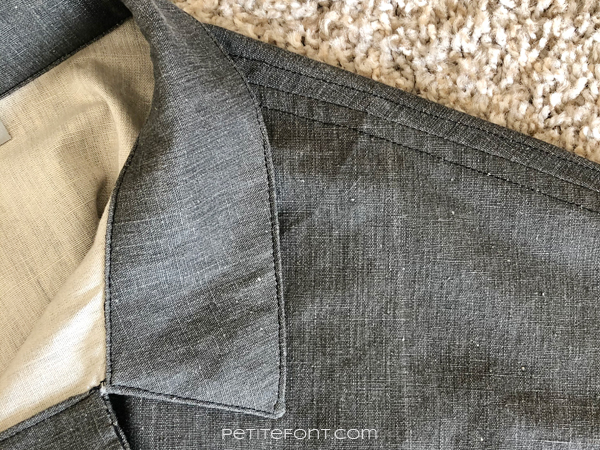
Adding Side Vents
Let’s talk about a successful hack, yes?
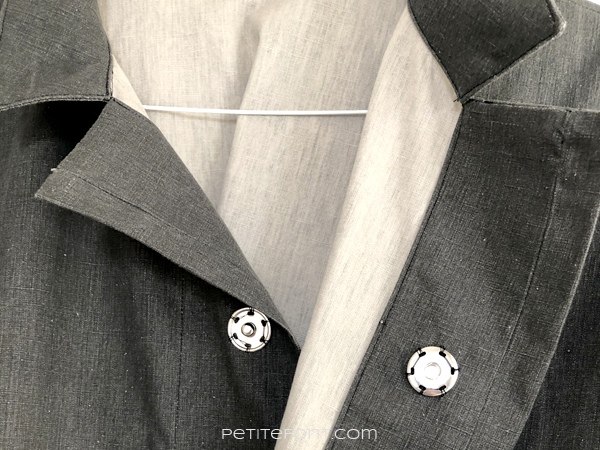
Because this Ilford was going to be worn untucked, I thought it would be cool to add side vents. This is a really easy thing to do!
You basically need to decide how far up you want your vents to go and then add additional fabric to the side seam there (here’s a great tutorial from another Sew My Style featured pattern company!). I made mine come up 3″ from the finished hem, and before I cut fabric, I added an extra inch (2.5 cm) to each side seam up to that point.
To avoid raw edges on the inside, I clipped the side seams at the top of the vent, then folded half an inch down onto itself and sewed it down. It’s a nice look. I didn’t bother doing mitered corners, but that’s fine. Here’s a look at the inside.
More Ilford Shirt Changes
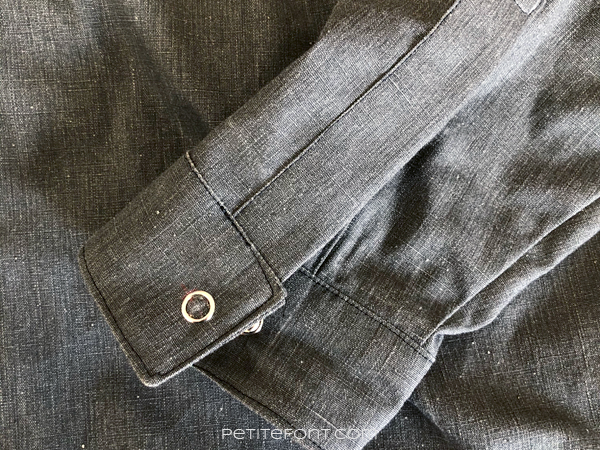
Two other things I did to the shirt were to topstitch all the seams, as seen here on the shoulder.
I also used snaps instead of making buttonholes in the cuffs. Saved me the headache of finding buttons AND sewing freaking buttonholes!
Let’s also talk about this
This is also the easiest placket insertion I’ve ever done. Especially compared to instructions from Big 4 patterns, this made it a piece of cake! One caveat is apparently my husband has large forearms, so the placket didn’t come up high enough for him to roll the sleeves up much, something he really likes to do. This is also true in his RTW shirts, so it’s not a pattern issue. Now I know so I’ll note that for next time I need to make him some long-sleeved cuffed shirts.
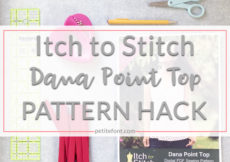
The Ilford Jacket as a Shirt

The Ilford Shirt turned out fine. It isn’t perfect, but he said he’ll still wear it. The facing is kind of ridiculously large but I’m just going to say that’s part of its charm!
I used the same two-toned linen fabric for this as I did for my dad’s Burda pants. This is the “wrong” side of it, which is why it looks different than on the beige pants. I like that it has a crisp look and feel.

So in this

Check out those huge snaps!
Share and pin for later!

New to Sew My Style? Learn more and join in here.
Sew My Style 2020 includes these talented sewists, catch up on their #SMS20 posts:
Aaronica @ The Needle & The Bell | Ari @ Max California | Minna @ The Shapes of Fabric | Carol @ Chatterstitch | Michele @ WinMichele | Julian @ Julian Creates | Florence @ FTMom3 | Kelsey @ Seam Lined Living | Kris @ Sew Notes | Laura @ The Specky Seamstress | Sarah @ Haraz Handmade | Shelby @ Handmade Shelby | and SMS20 Coordinator Paulette @ Petite Font
To stay up-to-date with all the #SMS20 news, pattern discounts and inspiration, be sure to subscribe to the newsletter at Sew My Style 2020.