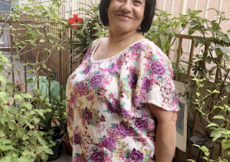
I’ve made this top 3 times now, so I thought it was time to properly give the Seamwork Loretta a pattern review.
The type of fabric you use for this top can greatly impact how it looks. In the drapey poly chiffon, it flutters around me. In my mom’s floral shirting, it has a similar silhouette. But in this floral cotton gauze, it can be a tiny bit like a tent.
Pattern Description & Cost

From the website:
The Loretta top is a pull-over design with both a blouse and tunic option. This easy-to-make top features dramatic flutter sleeves and a convertible off-the-shoulder or scoop neckline.
Version 1 is a tunic-length top and version 2 is a blouse-length top that can be paired easily with pants or skirts.
The instructions label this a “modern peasant blouse.” What the marketing doesn’t mention is that this is a raglan sleeve blouse. That means that instead of set-in sleeves that have to be eased in, the sleeves come in at an angle from the side seam and makeup part of the neckline. Think baseball shirt. This makes it a slightly easier project than a typical sleeved shirt.
There was a tiny bit of controversy with this release. People carped about the very low armhole (see Meg’s post about this). This is a relatively simple fix, but not necessarily easy to execute. I’ll explain in the Pattern Alterations portion.
Seamwork has a membership-based model. You used to pay $6 monthly and get 2 credits per month towards their entire library of patterns (now including their sister company Colette Patterns, too—these used to cost 3 credits but now they’re only 1). They’ve since updated their membership to limit the credits to one, two, or unlimited patterns depending on your tier ($70-$180 annually).
Otherwise, their patterns cost between $12 and $14 for non-members or $7-$9 for members.
Size Chart
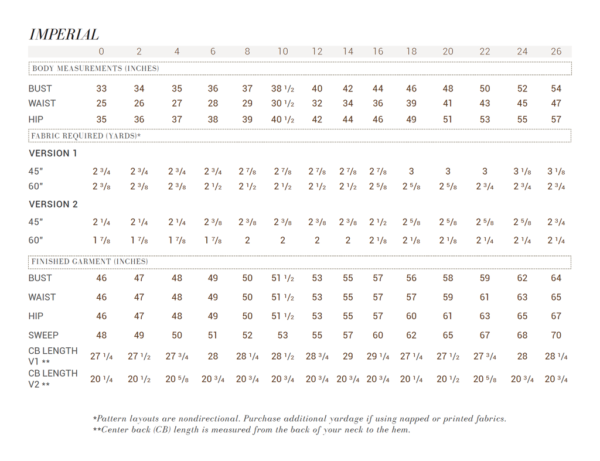
Click pic for a larger version on Seamwork’s site
The size chart goes up to US size 26 on the above picture (the metric version is on their site), which corresponds to a 54″ bust, 47″ waist, and 57″ hip (137-119-148 cm). I had originally chosen a size 12 because the ease is 13 inches (33 cm). But as you can see from my Spanish Loretta, it could still use a full bust adjustment to lie properly across my chest.
Seamwork patterns are broken into two ranges (or at least they were when this was released). 0-16 is the Misses range and 18-26 is the Curvy range. Patterns are drafted for a C cup in Misses and DD cup in Curvy. Read more here.
Fabric
The recommended fabrics are lightweight fabrics such as lawn, voile, linen, cotton blends, rayon, and double gauze.
Since this can be easily lengthened into a dress, I’d also recommend a slightly heavier weight for those versions unless you like to line dresses (I don’t!).
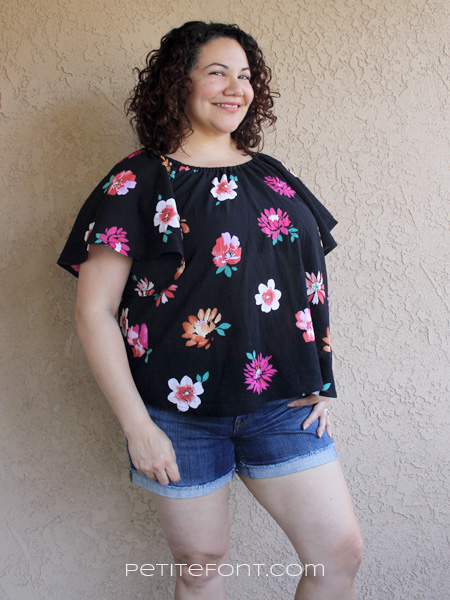
This black one is made in cotton gauze from Joann.
PDF Criteria
Here is how the PDF stacks up:
- Layered sizes: yes
- Colored lines by size: no
- No trim pattern: no
- Prints to edge of paper: no
- Print layout included: yes, pages 12-13 of the instructions
- A0 available: yes, 2 separate files for Misses and Curvy ranges
- Number of pattern pieces: 6 total (only 4 for Version 2)
Pattern Notions
The notions listed on the Seamwork website are: all-purpose polyester thread, sewing machine needle, two yards of 1/4″ braided elastic, loop turner, and bodkin or safety pin.
I would also suggest store-bought double-fold bias tape if you’re lazy like me.
Pattern Instructions & Tips
Seamwork pattern instructions come with a full-color cover showing the model in a casual pose wearing a version of the pattern. Inside there are fit guides for each version, including separate drawings for Missy and Curvy.
The actual instructions are only 6 pages long (from page 18-23). Each step is illustrated with clear line drawings.
As mentioned above, I’m lazy. I don’t like making bias tape if I don’t have to, so I like using pre-made bias binding tape for these shirts. I can always find one that either matches or contrasts nicely with my fabric.
This little lazy hack means you won’t have to use piece D, which is a yard long and cut on the bias. This will also save you a good chunk of fabric!
Pattern Adjustments
Originally all I did to this pattern was make the armholes 2.5″ (6.4 cm) higher, shorten it a few inches, then go on my merry way. After 2 years of more sewing know-how, I realized I did it wrong (even if it worked out).
This time I opted to add in the full bust adjustment I eschewed in my first version. To figure out precisely how much I needed, I approached this very scientifically.
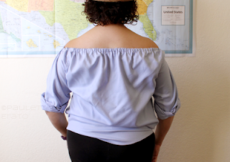
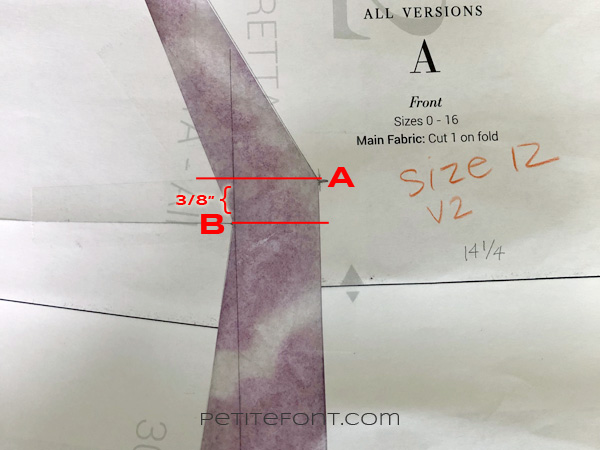
My Spanish Loretta has horizontal stripes. So I put it on and measured how much the stripes deviated from being parallel to the ground instead curved up my boobs. It was about 3/8″ (.95 cm) off from parallel.
See how the stripes curve over my boobs?
I cut my pattern piece in the normal FBA manner. To determine how large the FBA needed to be, I opened the space until the distance from points A and B equaled 3/8″ measuring vertically parallel to the grainline. That led to about 1″ (2.5 cm) space for the full bust adjustment.
Then I closed the dart and took out the extra width at the bottom from the side seam. When doing that I flared the side seams slightly by about 1/2″ (1.3 cm) at the hem.
After ALL of that, then I went back and fixed the armhole issue. I realized I only needed 2″ (5.1 cm) more at the bottom of the armhole, not 2.5″ (6.4 cm) as I’d done originally. So I raised the armhole by that amount on both the front and the back pattern pieces. Then I walked both sides of the sleeves along the seam lines and determined how those lines needed to change to meet.
This is what I hadn’t done the first 2 times. Instead, I’d simply added 2.5″ (6.4 cm) to all pattern pieces without measuring to make sure they fit together. They didn’t, but I was too green to know better! Because the seams are on a bias, they were easy enough to stretch to meet, but that’s still sloppy. This time they came together much better.
Pattern Difficulty Rating: 1.5/5
I like to judge a pattern by how early in my sewing journey I was able to make it successfully. I had been sewing for about a year when I made this. It isn’t a strictly level 101 beginner’s pattern. But if you’re comfortable working with bias binding, then it’s pretty simple.
I’d give it a 1.5 on a 5 point scale.
Final Thoughts
I love the name of this pattern, Loretta. It’s kind of old-timey without being dated. Vintage, one might say. I also love that the pattern model is an older woman (shout out to @sewover50!).
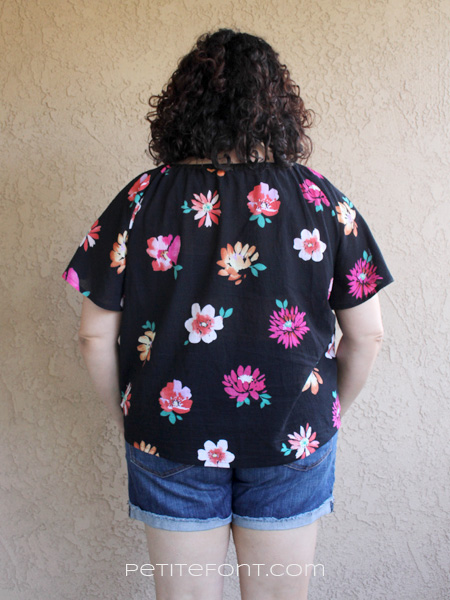
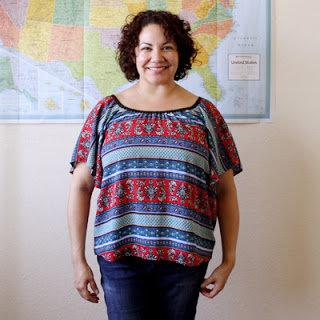
I get a lot of wear out of both of my Lorettas. It’s been two years and my original one is still one of my favorite shirts. I made the black floral one on a Saturday and immediately wore it that night, and several times since!
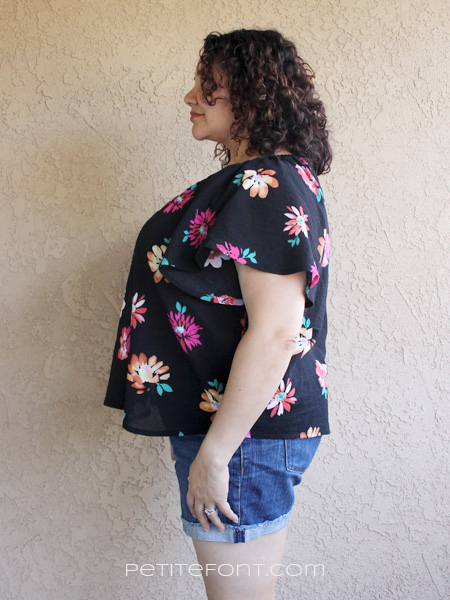
The drape with this fabric is a bit stiffer than my original, so it stands out from the body a little more. You can tell in the side shot that it almost starts to look like a tent. I think for future versions, I’ll use a fabric with more drape for the short versions and fabric like this for the tunic version since it has a belt for definition. I might also add some more waist shaping instead of simply straight seams.
Have you made a Seamwork Loretta? How did yours turn out? Did you also have an issue with the armhole?