
If you’ve never made the Style Arc Como then welcome to the Como Cardigan Sew Along!
 In Part 1, I’ll go over the pattern and discuss appropriate fabric options, tools needed, and how to cut the pattern. In Part 2, I’ll show you how I sewed mine together.
Here’s the pattern description:
This long-line fashionable cardi sewing pattern is a must have addition to your wardrobe. It has a cleverly designed all-in-one dropped shoulder line and a front band that hugs the neckline. This cardigan is finished off with two lovely large patch pockets.
If you’re new to Style Arc patterns, then we’re in the same boat! This is my first time making one of their patterns.
Frankly, I’ve been scared of them! Some of their patterns only come in one size to a PDF (which makes blending hard). I’d also heard rumors that the instructions were very sparse—and the rumors are true! So that’s why I’m embarking on this sew along.
First, don’t be scared! The pattern looks a little strange, but it’s not hard. I promise.
Let’s walk through the fabric options, what tools you will need, and a few pattern idiosyncrasies.
*Housekeeping: full disclosure, I received this pattern for free as a member of the #sewmystyle2019 leadership team.*
Fabric for the Como Cardigan
The suggested fabric is wool jersey, baby wool, sweater knit. Since it’s meant as an outer layer, wool is a great choice. It’s warm and breathable. It is also kind of expensive and usually requires dry cleaning.
Another of the suggested fabrics is sweater knits. These come in all sorts of fibers from wool and cashmere to polyester-spandex blends. You can opt for a chunky sweater knit or a very lightweight sweater knit.
Or for a more structured look, you can go off script and try double knits or ponte fabrics. Even scuba! It’s totally up to you.
The important factor in picking fabric is to make sure it stretches. Knits, because of the way they’re created, are naturally stretchy fabrics. You do not want to use a woven fabric like quilting cotton or poplin for this.
I’m using a cotton spandex ribbing because that’s what I had in my stash. It has a 100% stretch. Even though a stretch percentage isn’t specified by the pattern, I am sizing down because of the large amount of stretch.
We have some fabric suggestions (and inspiration pics!) on our Como Pinterest board:
[apsp-board-widget board_url=”https://www.pinterest.com/petitefont/sew-my-style-2019/como-knit-cardigan/” custom_size=’custom’ image_width=”100″ board_height=”340″ board_width=”600″]
Tools for the Como Cardigan
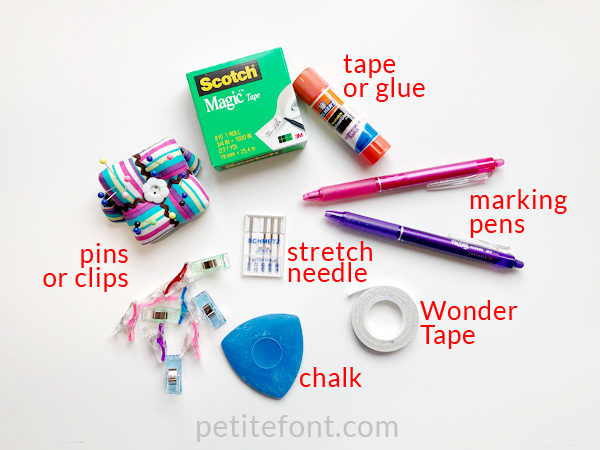
As with all PDF patterns, you will need to tape or glue the pattern together.
You can sew the entire thing on a regular sewing machine with a stretch or ballpoint needle, using a stretch stitch. Most machines have a zigzag stitch that can be used with knits. I’d also recommend a walking foot!
Or you can use a serger/overlocker for most of the inside seams but you will still need a regular machine to make the darts, attach the patch pockets, and finish the hems (unless you’re lucky enough to own a cover stitch!).
The instructions recommend a twin needle for hemming. If you don’t have a twin needle, you can simply finish the hems with a zigzag (or another stretch stitch) using a regular single needle.
There are marks to transfer to the fabric, so you’ll also need chalk, transfer paper, or fabric pens in order to mark the darts and pocket placements. There’s also tailor tacks if none of these other tools are available to you! (See my post about how I did this on the lace portion of my Givre cocktail dress.)
You can use pins if your fabric allows it. Or clips if it’s too loose or bulky for pins. Binder clips work great!
Another optional tool is some Wonder Tape. This is a special double-sided adhesive that won’t gum up your machine but does allow you to temporarily stick pieces together, then it just washes away. This will be an excellent tool for attaching the pocket later on. You can usually find it in the quilting tools area of a store (or buy it on Amazon).
Cutting the Como Cardigan Pattern
The seam allowance is 3/8″ or 1 cm and is already included in the pattern.
The pattern has 6 pieces:
- Sleeve
- Back
- Front (and yoke)
- Front band
- Back neck band
For clarity, I will refer to the pieces by both their name and number.
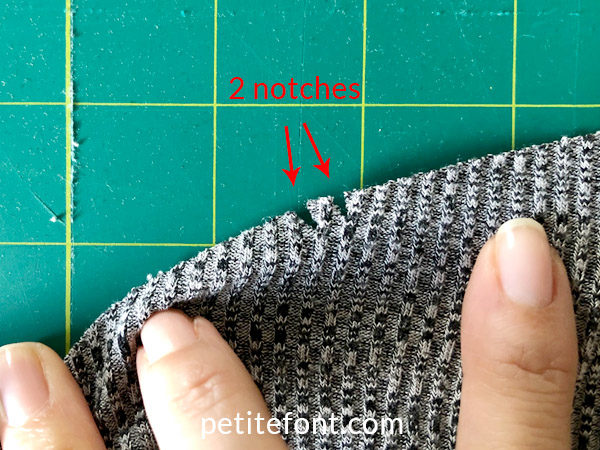
Follow the instructions to cut the Back (2) and Front band (4) on the fold, and two of everything else. Note the notches! The sleeve does NOT have a typical double notch for the back! You can either cut two notches or simply make a mark so you know that’s the back.
I made 2 notches since that’s what I’m used to. Otherwise, I’ll confuse my front from my back sleeve!
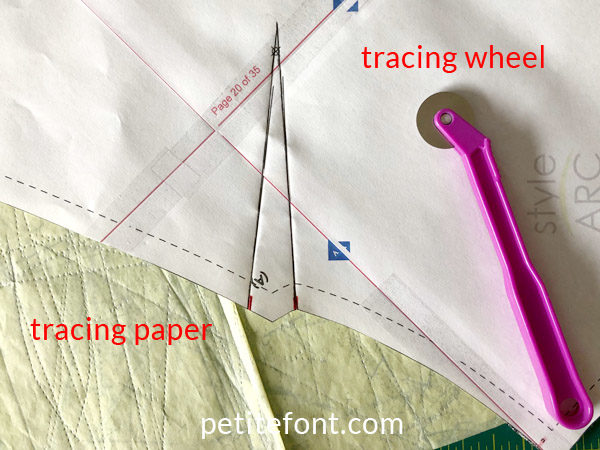
Make sure to transfer all your markings! There is a dart in the Front (piece 3) as well as a pocket placement box on that piece too. I used wax transfer paper and a tracing wheel for this.
Another tip is to make a tiny notch at the top of the center back of Back (2) piece. This will help you line it up with the center back yoke in the Front (3) piece later.
Once you’ve cut the pattern and transferred your marks, it’s time to sew!
***
Next week in Part 2 of the sew along, I’ll walk through each step—with photos! I’m definitely a visual learner so photos help me better understand instructions.
Let me know in the comments if you made a Como before, and if you found any tricky parts.


Given my fabric choice (double-sided peachskin scuba, so three layers), I think I’ll be going off piste a lot! I have some microtex stretch needles, somewhere, and I guess they might come in handy. But, I’m not sure how I’ll finish the hems on this— I have a coverstitch machine, but I’m not very used to it yet and I’m really not sure how it’ll react— or whether I will finish them at all. I think I might also try to flatstich some of the seams on the overlocker. I will try to report and show samples on IG, but… Read more »
That sounds like an exciting combo in color and fabric choice!
Thanks for one’s marvelous posting! I certainly enjoyed reading it, you might be a great author.
I will ensure that I bookmark your blog and will come back in the foreseeable future.
I want to encourage you to ultimately continue your great work, have a
nice day!