
The Hey June Handmade Phoenix Blouse was one of the two patterns for September’s Project Sew My Style challenge. It had also been on my to-do list for quite some time.
What better time to make it than during this interminable summer?
*Housekeeping: there are affiliate links in this post, and I received this pattern for free as a member of the #sewmystyle2019 leadership team. Also, as an Amazon Associate I earn from qualifying purchases.*
On the Hey June Handmade site, the Phoenix Blouse is described as follows:
The Phoenix Blouse is a cute and casual boho style top in two views. View A features 3/4 length bell sleeves while View B is a flattering sleeveless style. Both views have a yoke with slit opening, front and back gathers, and a shaped back yoke. Length options include a cropped waist length, perfect for pairing with high waisted jeans, and a standard shirt length. Optional tassels or ties add a cute finishing detail! Read all about the Phoenix Blouse and see more pictures here.
I really appreciate the link to more pictures so you can see it modeled on different body types.
The pattern costs $10 for 2 views: sleeveless or 3/4 sleeves. You are also given the option of cropped or hip length.
The armhole for View A is similar to 2 other Hey June patterns, which are similarly priced. This gives you the option to interchange the sleeves across 3 patterns, giving you a total of 5 sleeve options. This is a cool idea, though I do wish there was a bundled pattern option.
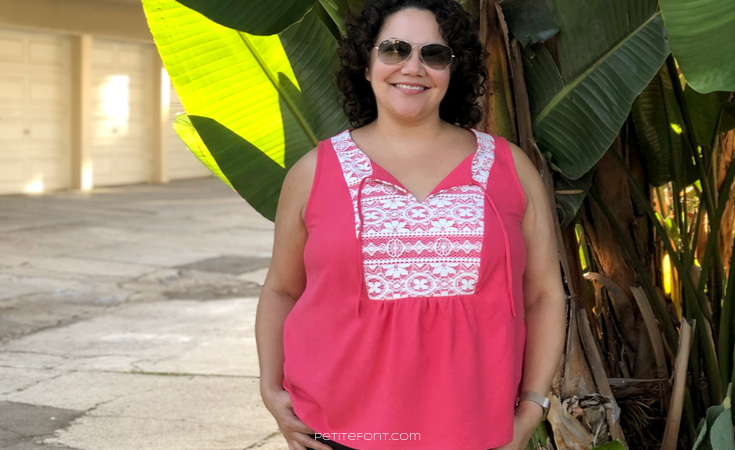
I chose the sleeveless option, View B, in the regular length.
Phoenix Blouse Size Chart

The Phoenix Blouse size chart ranging from sizes US 0-22 doesn’t look all that inclusive, but that’s deceptive. Pay attention to the finished measurements. This is extremely important to review.
My measurements are currently:
- High bust: 43.5″ (110.5 cm)
- Bust: 47″ (119.4 cm)
- Waist: 40″ (101.6 cm)
- Hips: 46″ (117 cm)
Going by my measurements my high bust is bang-on for size 22. That’s also the size I used when I made my Halifax hoodie, along with a 2″ (5 cm) full bust adjustment that was still too small and adjustment. But when you review the finished measurements for this pattern, you can see there is a LOT of ease.
Though you aren’t given starting bust measurements, Hey June drafts for a B cup, or a 2″ (5 cm) difference between high bust and bust. That means the bust measurement would be 45.5″ (115.6 cm) for size 22. Given that information, there are 6″ (15.3 cm) of ease in the bust. There are also 7″ (18 cm) of ease in the hips.
LOTS of ease.
I’ve documented my specific pattern adjustments below. I ended up making a size 16, which is 3 sizes smaller than I expected. So while the size chart only goes up to US 22, I think it covers a larger range than it seems.
Fabric
The recommended fabric for the Phoenix Blouse is:
For best drape and fit, a lightweight woven such as rayon, poly, silk, lawn, voile, gauze, or linen blend fabric is recommended.
I had a watermelon pink silk noil in my stash (yay for #sewyourstash fabric!). I paid $1/yard of it, which sounds like an utter lie, but it’s true. I also have 7 yards of a blue colorway that cost the same. Which is too bad because I hate blue and really like this color, but what can you do?
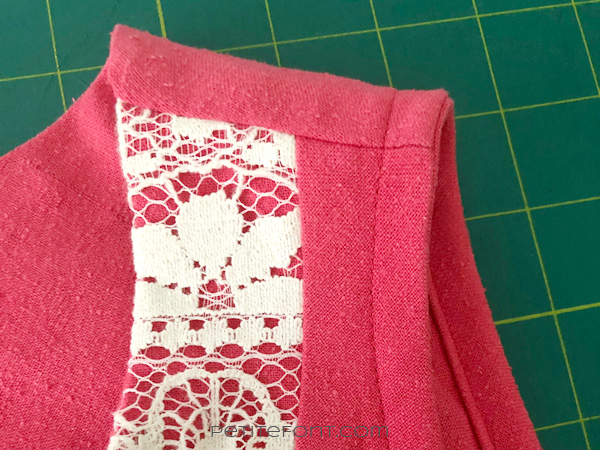
I also totally copied the cover art and repurposed a cotton lace tablecloth for the front yoke. I considered doing the same to the back yoke, and even cut out the piece. In the end, it was a little more trouble than it was worth though. I kept the back plain.
PDF Criteria
Here is how the PDF stacks up:
- Layered sizes: yes
- Colored lines by size: no
- No trim pattern: no
- Prints to edge of paper: no
- Print layout included: yes, page 5 of the instructions
- A0 available: yes
- Number of pattern pieces:
- View A: 5 (pages 39-63)
- View B: 4 (pages 24-40)
The pattern is intelligently mapped across the PDF layout so your ink isn’t wasted printing pages you don’t need. You also don’t waste time and paper taping together pages for one tiny corner of a piece!
The instructions also include specific pages to print or omit based on the regular or cropped length options. This is a great added value that is not included in all PDF patterns.
Pattern Instructions & Tips
Like my previous experience with a Hey June pattern, the instructions were very clear. Each step for the Phoenix Blouse is illustrated with a line drawing.
The pattern pieces themselves could use a few extra notches. Thankfully everything matches up perfectly, but a few additional guide marks along the princess seams, side seams, and shoulder seams would be great.
I needed a full bust adjustment (like always) and there are very clear instructions for this linked on the Hey June website. Don’t worry if your bust point is lower than the illustrated example. Mine was basically at the punch point (thanks gravity!). Opening the dart in the main bodice effectively lowered the yoke to the appropriate spot.
If you find yourself in this position, make a muslin. I had to make 4…worth it!
I did find 2 discrepancies in the bias binding and the front ties, though.
First, the dimensions for the bias binding were off. The instructions call for 30″ long by 1.75″ wide (76 cm x 4.5 cm). For size 16, I needed 25″ (63.5 cm) for each of my armholes but found the bias to be too wide (even after folding in half). It would’ve overlapped with the existing princess seam in the front shoulder. To remedy this, I cut it in half length-wise so it was 7/8″ (2.2 cm) wide binding instead and that fit better.
This also allowed me to sew the two 30″ pieces together to form one longer 60″ (152.4 cm) of length, which was desperately needed!
Second, the front ties aren’t as long as you’d expect them to be if you go by one of the modeled examples. Cover model Allie Olson is wearing a sleeveless blue lace-front version of the Phoenix Blouse with very long ties. They go down to her hems. A few other versions show shorter ties, and these better reflect what’s written in the directions.
Of course, you can make your ties as long as you please!
Last tip: if you choose to do a lace overlay on the yoke too, I still recommend cutting 2 yokes out of your main fabric. The slit down the middle has to be interfaced on either side of the stitching, which can show through the lace. Basting the lace to the top yoke layer and treating them as one gives the lace an anchor and hides the interfacing!
The amount of lace needed will depend on any adjustments you need to make to the pattern. On size 16 with a 2″ FBA, I used less than 1/4 yard (a little over a 1/5 meter). I only cut 1 lace panel.
Pattern Notions
The Phoenix Blouse instructions call for a small bit of fusible interfacing (approximately 4″x5″ or 10×12.7 cm total) and single fold bias tape if you choose not to make your own. Interestingly, it suggests 2 yards (1.8 m) as opposed to 30″ (76 cm) of bias tape.
Pattern Adjustments
This was a doozy. I had some helpful fitting advice between versions 3 and 4. It’s a simple-looking pattern, right? Since it’s always better to start large and cut down than go the other way, I started with a size 22 based on previous experience and my high bust measurement, then worked my way down from there.
Phoenix Blouse Version 1
I’m petite, so armholes can be a problem (see my 90s flannel fail for an illustration of this). I’m bigger around than I am vertically, but armholes get bigger with every size. To combat this, but to preserve the most amount of fabric, I cut a size 22 pattern blended with a smaller size 4 armhole. I could cut away the armhole if it was too small but I couldn’t add fabric back if it was too big.
I did my typical 2″ (5 cm) FBA and 5/8″ (57 mm) high round back adjustments. I didn’t move the waist up 3″ (7.6 cm) just yet, because I didn’t know where the yoke was going to fall on my body, and that might impact where the shortening process might take place.
Result: way too big a shirt with an armhole that was way too tight.
Phoenix Blouse Version 2
I scooped out the armhole to the full size 22.
Result: as expected, the armhole was way too big now. L’sigh.
Phoenix Blouse Version 3
I completely redid the FBA this time and moved the yoke down several inches. I don’t know what compelled me to do this, but visually I hated it.
Because no finished waist measurements are given, I decided to use the finished hip measurements to determine how much I could pinch out at the side seams. With 46″ hips, 50″ (size 16) seemed like enough to keep a loose fit on the blouse without it being overwhelming. So I pinched out the shoulders and side seams to that size.
This brought the armhole up to the correct position too!
The difference between size 22 and size 16 was 2.25″ (5.7 cm ) total of width removed from the side seams and 1.125″ (2.9 cm) total off the shoulders.
The waist on the pattern actually hit me in the right position, but the length was still too long. I chose a point around where my high hip should land on the pattern and raised the pattern’s approximate high hip up 3″ (7.62 cm) to that spot.
Result: this was a MUCH fit better in the width, but moving the yoke was a mistake. I felt kind of matronly in it, so I moved it back to its original spot with the FBA intact.
Because I still hadn’t addressed the swayback I typically need, I made one more muslin!
Phoenix Blouse Version 4
Taking all the adjustments from V3, moving the yoke back to its intended position, I then did a 2″ (5 cm) swayback adjustment.
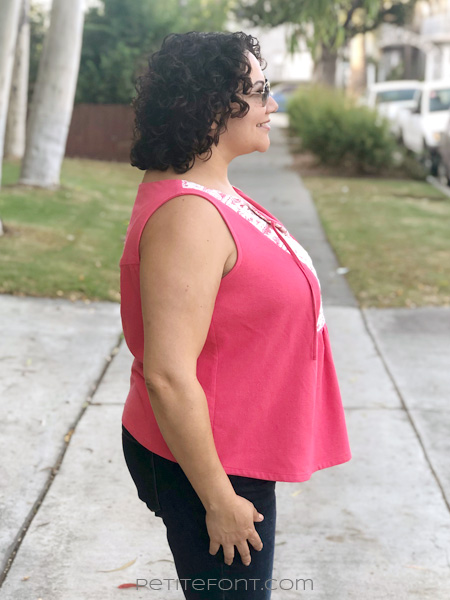
To avoid adding a center back seam, I moved this adjustment to the side seams. Unfortunately, I forgot to true the hem when doing this, which messed up the curve of the back hem. That’s why you’ll see a straight back hem in the photos below. (I forgot to fix this before cutting the silk! Oops.)
Result: time to cut the silk!
Pattern Difficulty Rating: 2/5
The Phoenix Blouse is not strictly a beginner pattern. It’s not very hard, but it does require a bit of knowledge working with princess seams, and some slightly advanced techniques like bias binding, gathering, the burrito rolling method, and curved hems.
A very confident beginner could absolutely pull this off. The instructions are great for beginners, but it will require patience if these techniques are new to you.
Start to Finish
As I mentioned in this post, I’m going to start accounting for the time it takes to finish a project. I actually always do this in my notes, so I might as well share the information with you.
I printed and taped together the pattern on September 16 and finished the final stitch on September 20. I then immediately wore it on a date to see Downton Abbey!
Over the course of those 5 days, I dedicated an average of 4.5 hours per day on it.
That’s a grand total of 22.5 hours on this one blouse. That isn’t too unusual for the first time making a pattern. But it was more than I expected for what I thought was a simple-looking blouse.
Final Thoughts
Even though it took 4 tries over the course of 5 days, I love this blouse! All the work that went into it actually made me like it MORE. Usually, that much effort turns me off, but I think this time I was determined to conquer it.
Despite my seemingly endless tries at it, I still had a few little mistakes in the end product. Next time I’d grade the seams in the back yoke a bit more. I’d also be more precise around the yoke corners.

You can see there’s a bit of puckering in the seam joining the back yoke to the back bodice.
That FBA really helped though! This fits SO MUCH better than my hoodie!
This color is awesome. I don’t have anything else like it in my wardrobe. I love how it looks on my skin tone.
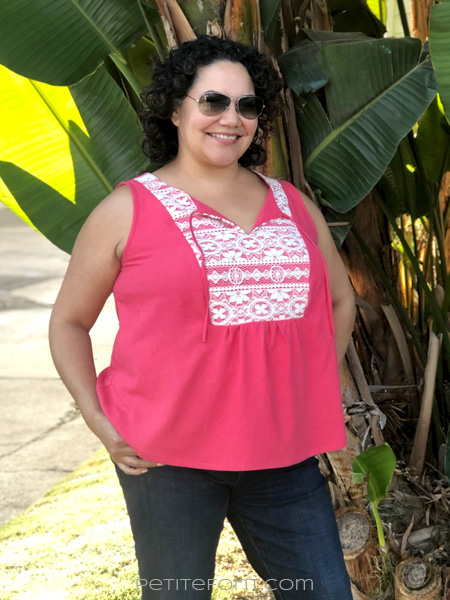
The Phoenix Blouse is a great little top to wear with jeans like I did here. Or you can dress it up by wearing it under a suit, tucking it into a skirt (or not tucking it), and so on.
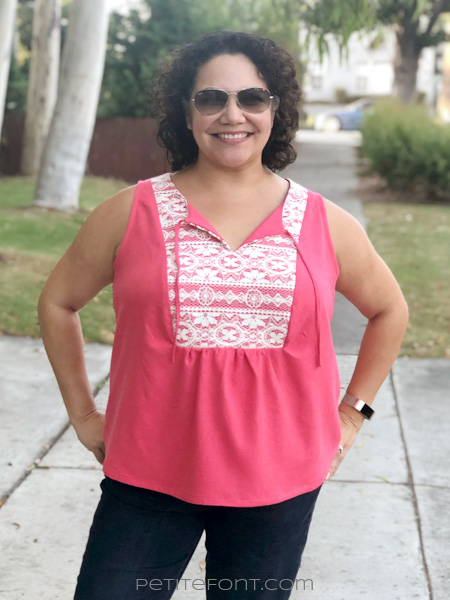
The blouse has great drape. It’s flowy without being overwhelming. The front gathers are at the appropriate spot to avoid drawing attention to the belly, yet manage to hide a food baby. You know, for feasts like Thanksgiving!
I still plan to make the long-sleeved version. Since I spent so much time perfecting the fit, I might as well! I have a dark burgundy/wine cotton gauze ready for it. The fabric is fine for summer but the color is perfect for moving into fall…whenever that gets here!
Have you made the Phoenix Blouse? What was your experience like?


This looks phenomenal on you! I love that color! I have a couple notes just in case anyone is reading this and might make alterations – the bias binding is intentionally longer than the armscye just because the mechanical stretch in different fabrics along with the inherent stretch in bias cut fabric can cause you to require different lengths depending on fabric. So everyone needs to trim after applying the bias. I’m also confused as to how yours ended up too wide. 1.75″ folded in half and then sewn with a 1/4″ seam allowance yields a finished bias width of… Read more »
The fit you achieved is amazing! That hard work paid off. You’ve inspired this newbie to keep practicing and not be afraid of pattern adjustments! I’ve made the Phoenix twice in two different sizes and I wasn’t sure about the fit on either. The shoulders of the smaller size fit great, but the ease of the bigger size is more comfortable. I didn’t know there was a tutorial for a Phoenix FBA! I may have to try it.