
Today’s hack is on how to create a back slit on the Orchid Midi. Spoiler alert: it’s SUPER easy.
If you read Tuesday’s post, you already know how to shorten the skirt and also make the A-line slightly more narrow. Aside from the midi-length, the other defining feature of the Orchid skirt is the front slit.

When the skirt is at the full original length, the slit comes up to just above the knee or so. It looks really cool. But what if you want a slit in the back instead? I got a hack for that!
However since I shortened my Orchid to a skinny mini length, I knew the slit was going to be WAY too high. Remember, I took 5.5″ (14 cm) off just below the hip, effectively raising the slit along with it! It went from just above the knee to just below my lady bits.
Scandalous!
But I’ve got a hack for that, too! So first I’ll show you how to alter the pattern pieces to move the slit to the back. Then I’ll show you what to do if you need to lower the slit, too.
How to Create a Back Slit on the Orchid Skirt
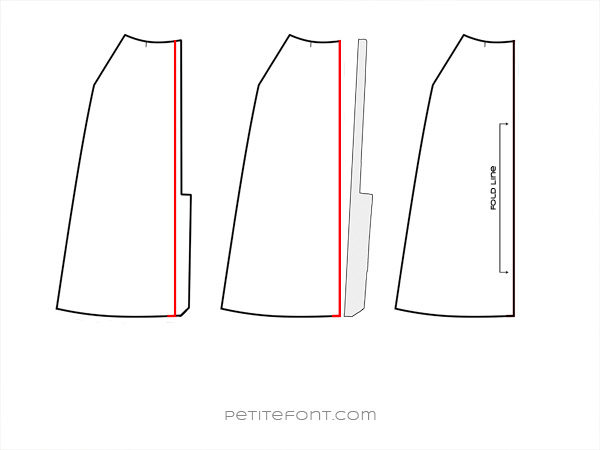
The Back Skirt is cut on the fold, but the Front Skirt is not. We’re simply going to swap them!
- On the Front Skirt, measure in from the center front cut line (not the extension at the bottom) 3/8″ (1 cm). Extend this down to the hem and extend the hem to meet it at 90º.
- Cut off the extension along this line. The red line is your new fold line.
- Cut 1 Front Skirt on the fold.
- On the Back Skirt pattern piece:
- Take the extension you cut off in step 1 and tape it to the center back line.
- This is your new pattern piece. Instead of cutting this piece on the fold, you will now cut 2 mirrored pieces.
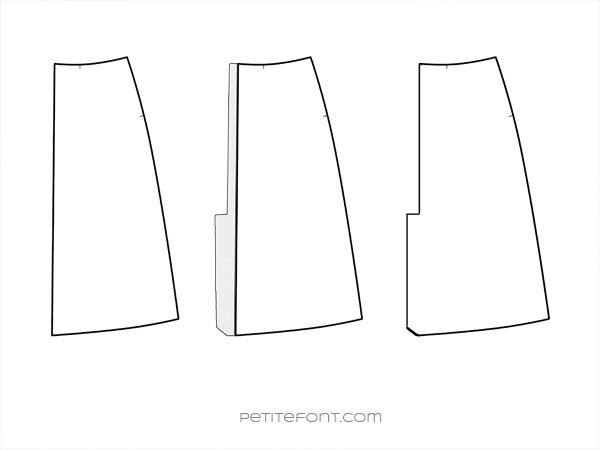
And that’s it!! You have successfully moved the slit to the back. Follow the rest of the directions to make your skirt (be sure to swap the front and back interfacing pieces, too) and attach it to the bodice.
But what if you don’t want the slit so high up your legs? If you want to make the slit shorter, it’s very easy.
How to Shorten the Slit on the Orchid Midi
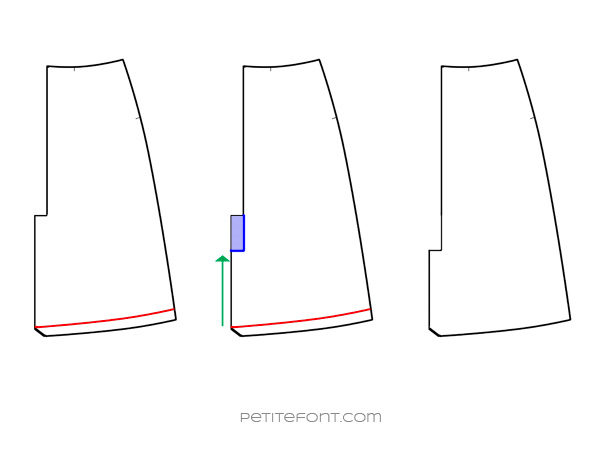
If you haven’t altered the pattern to move the slit to the back, this same hack will work for the front pattern piece. For continuity, I’ll show you how to do it on the back piece, but the process is the same either way.
- Use your new Back Skirt pattern piece. Take into account the hemline, seen here in red.
- Measure up from the hemline to determine how far up you want the slit to go (shown by a green arrow). This example shows the new lowered extension height in blue. (Note: According to Fashion Pattern Making Techniques Vol. 1, a standard kick pleat in the back of a skirt is 16-25 cm or 6.3″-9.8″ long.)
- Cut the rest of the extension off above this line (the shaded blue area). This is your new Back Skirt pattern with a shorter slit.
That’s it! Really, it’s just ONE step to lower the slit. Easy, right?
If anything is unclear, let me know down in the comments.
Here’s a look at how my shortened skirt with the back slit looks. It’s much more subtle than a long front slit on the midi skirt.

Check back next week when I’ll post my review of the PDF pattern, along with more pictures of the whole dress!


Thank you! This was super clear and I’ll be using it today!
I’m glad you found it helpful! Can’t wait to see your finished dress!