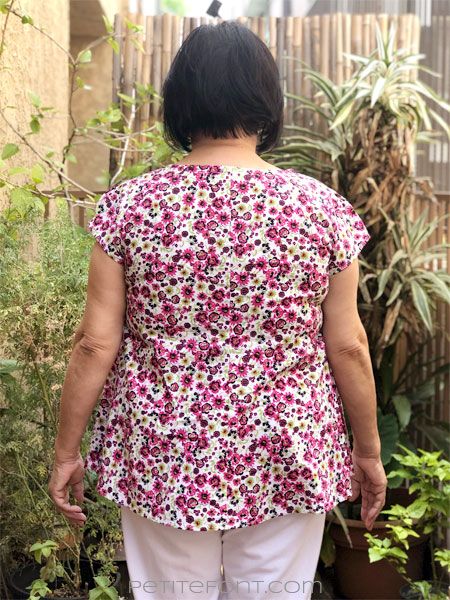
 New Look 6414 was part of my mom’s wish list from 2018. So for her birthday, I sewed up View D in floral quilting cotton.
Unlike most Big 4 patterns, this one has a beefy description (relatively speaking):
Misses’ loose fitting blouse has V-neck with bell or short sleeves with contrast yoke. Top with keyhole neckline features bishop sleeves and a sleeveless version in a longer tunic length.
What the description fails to mention but you can see in the line drawings is that it’s a swing style top and tunic. The flared hem is really great for extra swishiness (and hiding food babies after big meals) while being more fitted at the shoulders and boobs.
View D calls for a contract yoke and sleeves, but I skipped that and kept it all in the same fabric.
New Look 6414 Size Chart
The size range is pretty broad for a Big 4, encompassing US sizes 8-20 (European sizes 34-46) which equates to a bust range of 31.5-42″ (80-107 cm).
The finished bust measurements are 34.5-45″ (88-114 cm). That means there are 3″ (7.6 cm) of ease built into the shirt. Most sources put 3″ of ease as a semi-fitted garment, so it’s interesting that New Look describes this as “loose fitting.”
Because I know from previous experience that my mom fits a New Look size 16, that’s the size I chose for this top.
Fabric
The suggested fabrics on the back of the pattern envelope are lightweight and/or silky woven types: batiste, charmeuse, cotton lawn, cotton types, crepe back satin, crepe de chine, dotted Swiss, double georgette, faille, gauze, silky types, voile.
As I mentioned above, I used quilting cotton. Yes, you can use quilting cotton for clothing!
It’s not great for everything, especially clothing that is meant to be flowy. But it worked out well for this, giving the blouse a touch more structure without sacrificing the swingy quality.
Pattern Instructions and Tips
Unlike the similar long sleeve version C, View D has front and back shoulder yokes. That brings the pattern piece count to a whopping 6 total including the cap sleeve and neck binding. However, you can save yourself some cutting and fabric by simply buying pre-made bias binding if you choose (I used the leftover white binding from the peasant top I made for mom last summer).
The instructions are relatively straight forward. They do have you attach the front and back yokes (pattern pieces #12 and #13) and then staystitch the necklines. You’ll add bias binding to the neck after you attach the shoulders together and sew up the center back seam.
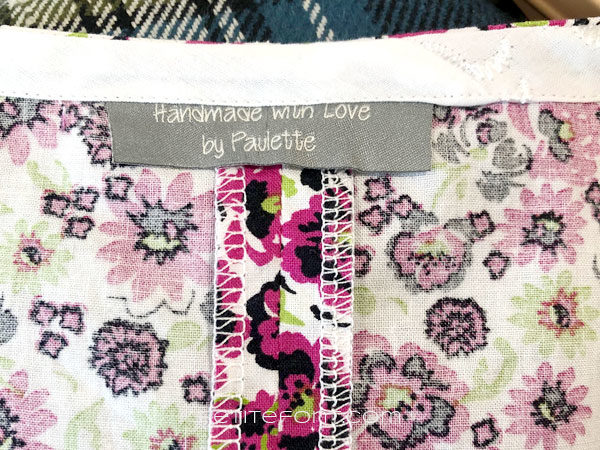
Tip: if you add a clothing label, do it as you’re finishing the neck binding. It will tuck in nicely like this:
Sew up the front seam after finishing the neckline, then move on to the hem. The hem is finished very narrowly. It’s 1/4″ (.6 cm) folded over twice, so 1/8″ (.3 cm). This can be a little tricky on a curved hem, so it’s a great idea to finish with bias binding or even a rolled hem foot.
Let’s talk about the excessively large sleeve head.
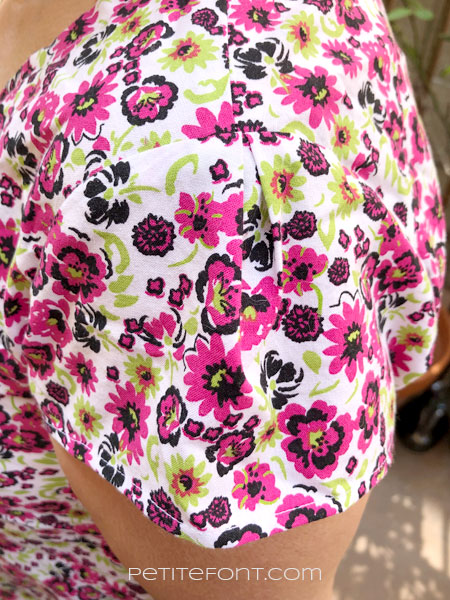
The sleeve has a ridiculous amount of ease built into the head. No matter how much steaming and gathering I did to it, I could not get a smooth insertion into the sleeve hole (armscye). After ripping out each sleeve 3 times, I finally gave up and pleated both sleeves at the center of the sleeve head for a quick and easy fix. The inverted box pleat also lends a cute additional detail to an already lovely top.
Pattern Notions
For View D you don’t need any additional notions (unless you opt to buy bias tape instead of using pattern piece #8).
For View A you’ll need a 3/8″ (.95 cm) button and a 1″ (2.5 cm) length of elastic for a button loop for a back closure. View B requires the same as View A, plus the addition of 2 more buttons (same size as the back button) and elastic (1 each for the sleeves).
Pattern Adjustments
US Size 16 corresponds to a 38″ (96.5 cm) bust but my mom measures 41″ (104 cm) so I gave her a 1.5″ (3.7 cm) full bust adjustment. This added a dart, which is fine. I also shortened the waist 3″ because my mom is short-waisted like me!
Additionally, she asked for slightly more modest v-neck so I raised the neckline 1″ (2.5 cm).
I realized after it was made up that I should have also narrowed the shoulders a bit, so that’s a tip for next time!
Difficulty Rating: 2/5
Because New Look 6414 Views C and D require a bias binding finish for the neckline, that does make it slightly more advanced than a simple beginner pattern. The sleeve insertion can also be a little tricky, as can narrow hems on a curve. Views A and B also require a button closure in the back. For those reasons, I would rate this an intermediate to advanced beginner project, or a 2 out of 5 on a difficulty scale.
Final Thoughts
I loved this top but it only mattered whether or not my mom liked it. And she did! She wore it immediately after I gave it to her, and it’s perfect for summer. She’s planning on taking it with her when we head to Puerto Rico later this year. That’s another win for quilting cotton since it’s nicely breathable!


