
The Deer and Doe Givre dress (and t-shirt) was one of the two Project Sew My Style (#sewmystyle2019) options for February. As a co-host for the project this month, I’m revealing my make a little early with my Givre Dress pattern review.
This was my first time using a Deer and Doe pattern. They are a French company (givre—pronounced geev-re—means frost or frosted in French). Their website and patterns are all in English as well. If you’ve participated in Sew My Style before, you might remember that their Myosotis dress was part of the 2018 project.
(I didn’t make it, and I’m sad about it.)
Their patterns come in both paper (for 14 €/$15.87USD) and PDF (11 €/$12.47). That does put them on the high end of indie patterns, but the value is pretty high as well.
*Housekeeping: full disclosure, I received this pattern for free as a member of the #sewmystyle2019 leadership team. However, all opinions are my own.*
Pattern Description
From the Deer and Doe site:
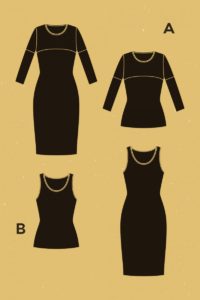
Close-fitting jersey dress and top. Version A has ¾ sleeves and a contrasting yoke, version B is sleeveless with a scoop neckline.
While this is a pretty basic pattern, it’s a great option for color blocking. It’s also a good introduction to a pattern with negative ease.
If you don’t know what negative ease is, Cashmerette did a great breakdown of it recently. Basically, it means the finished garment is smaller than your measurements because it’s meant to stretch around your body. Kind of like leggings or bathing suits.
So we’re talking about a potentially tight dress!
Size Chart

The English version of the site gives the size chart in inches. For the metric chart, you can use the French version here.
Co-lead Whitney of TomKat Stitchery has a great video on how to choose your size according to your high bust measurement and also gives 3 options for creating a full bust adjustment on a t-shirt like this.
Since my upper bust is currently 43.5″ (110.5cm) and I didn’t want a skin-tight dress, I chose size 50 for Version A.
Fabric
The recommended fabric for this body-conscious dress is a light to medium weight knit with lycra (for recovery) and at least 50% stretch. You really don’t want to use fabric without lycra (also called Spandex or elastane) otherwise the dress will stretch out and become baggy after a single wear.
The pattern listing also lets you know which fabric they used on the models. This is a really nice touch, as it gives you a really good idea of what different types of fabric look like in the finished garment.
I personally have never been a big fan of color blocking. I rarely buy matching fabrics in a similar enough weight. So I went in a different direction and used a stretch mesh lace for the yoke and top of sleeves and a poly-lycra for the rest.
PDF Criteria
Here is how the PDF stacks up
- Layered sizes: no
- Colored lines by size: no
- No trim pattern: no
- Prints to edge of paper: no
- Print layout included: yes, page 6 of instructions
- A0 available: yes
The two versions come in separate PDF pattern files. The A0 versions are also in their own separate files.
Pattern Instructions
The instruction booklet is 16 pages long and includes a full page dedicated to sewing with knits. Why so many pages for a basic pattern? The instructions are laid out very cleanly with lots of white space. This is helpful if you have to take a lot of notes. Which I did (see Pattern Adjustments below…)
The actual instructions for each version are a mere 3 pages for Version A and only 2 pages for Version B. Each step is clearly illustrated with line drawings.
Pattern Notions
No notions are listed in the instructions. I would recommend stay tape for the shoulders and neckline, as well as hem tape for the sleeves and hem.
Note: the entire pattern can be sewn on a regular sewing machine. While I did use my serger for most of it, I finished the hems with a regular zigzag on my sewing machine.
Pattern Adjustments and Hacks
Oh wow. This one was a doozy for me!
I made 3 versions of this dress because I was so scared of it being too tight. The first one was a near disaster because my fabric didn’t have any recovery! But it’s a really pretty fabric, so it will live on as a nightgown.
My second version was in nearly identical fabric to the finished one, but I cut the yokes and body as one (same for the sleeves). I didn’t want to waste time with extra seams!
So how many adjustments did I need to make?
- 2″ removed from the length
- moved waist up 1.75″
- shortened hip curve 1″
- 3/16″ added to center back of yoke
- Full bust adjustment: 2″ no dart FBA added to the side seam of lower bodice only (not yoke)
- 5/8″ high round back adjustment
- 1.625″ swayback adjustment
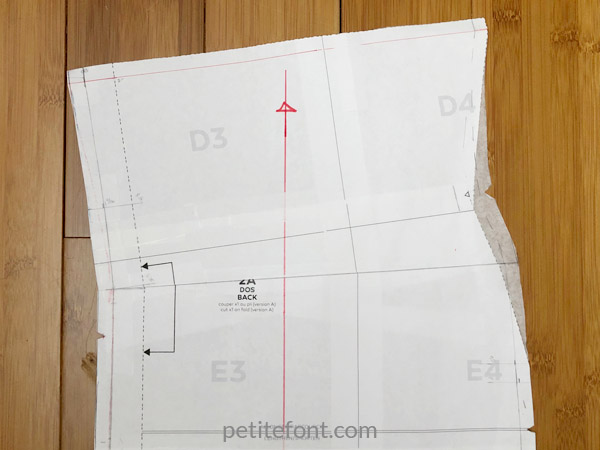
And because I didn’t want a seam on the back yoke, I had to ensure my pattern pieces matched up. After the massive swayback adjustment, I had to cut the lower back in two mirrored pieces.
Here’s what my new pattern piece looked like after the swayback adjustment. Notice the new grainline! The top back pitched off grain a full 10 degrees. There’s no cutting THAT on the fold!
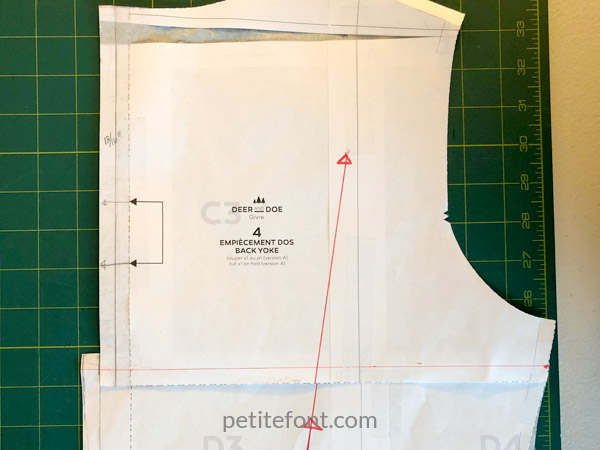
To cut the yoke on the fold but still match my back bodice, I simply overlapped the two pattern pieces on the seam lines, measured the distance from the center back of the lower bodice to the center back of the yoke (not including the seam allowance on the lower pattern), and added this much to my yoke piece (that’s where the extra 3/16″ for the center back of the yoke came from). Easy peasy!
I also extended the grainline up to the back yoke in case I ever wanted to cut one solid back piece in the future.
Looking at the finished photos, I’m thinking I could have benefitted from a larger FBA but also a narrow shoulder adjustment (that could just have been the fabric stretching out though). And I think I have to explore sloped shoulder adjustments now too. Geez…
Finally, I finished the neckline differently. Here’s a work in progress shot:
View this post on Instagram
I bound it with a simple store-bought narrow black bias tape. This worked because the neckline was large enough for my head to pop through, so I didn’t have to worry about lack of stretch there. It will also keep the neckline from stretching out, which it was very prone to do—that’s why my head fits through!
Because I also wanted the seams in the lace to be as invisible as possible but still hold strong, I used French seams on the shoulders and armholes. I was afraid that with the large holes in the lace that a serged stitch wouldn’t work, but a French seam did! Because the seam allowance is only 3/8″ (1 cm), I had to be very careful.
To get around the tight seam allowance, I overcast the first pass of the seams. That left me almost the entire 3/8″ for the second pass. The only thing I wasn’t able to do was properly stabilize the shoulders, which I might pay for in the future.
I serged the rest of the dress together (including the side seams through the lace).
Final Thoughts
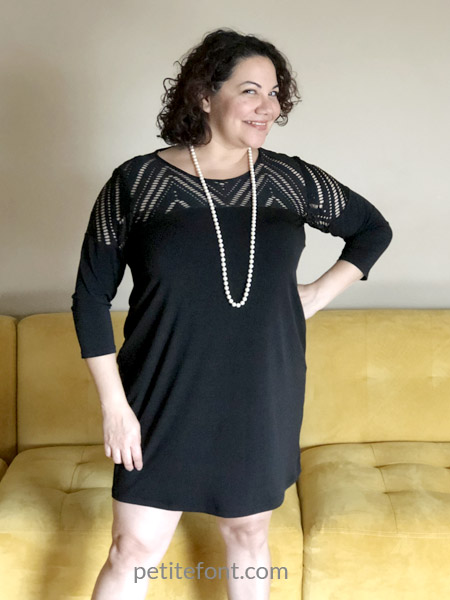
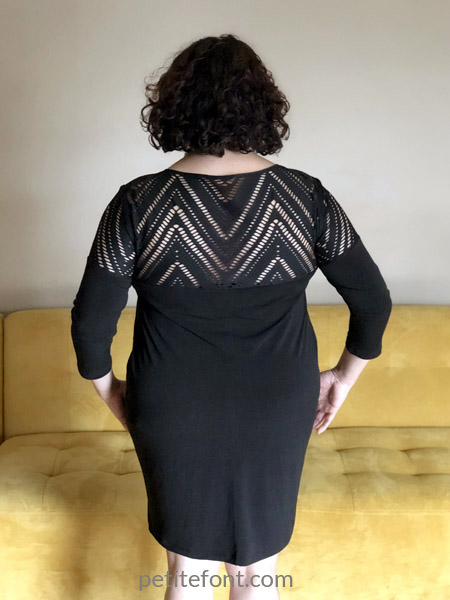
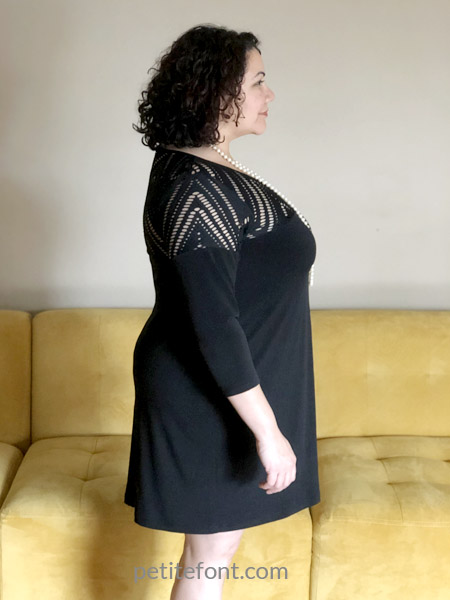
Despite the myriad of adjustments, I actually really like the finished piece. As you can see, it’s not very tight, which is fine. It was my first time working with this meshy stretch lace, and I like the finished look. It’s a bit more casual than a typical floral lace, which matches the rest of the black fabric.
The instructions were very clear and straight forward, which makes me excited to try more of their patterns. I have the free pattern for the Plantain shirt, which is also a basic tee. But maybe I’ll go back and give that Myosotis another look.
For now, El Husbando is taking me on a date night so I can put the dress to good use!
Did you make a tee and/or dress this month? Which pattern did you use? Let us know in the comments below and be sure to check out the rest of the February #sewmystyle2019 team’s posts and videos!
- Video – How to Buy Knit Fabric Online for the Deer And Doe Givre T-shirt – Whitney at TomKat Stitchery
- Video – Tutorial: 3 Ways to do a dartless FBA in a Knit Pattern – Whitney at TomKat Stitchery
- Video – Tutorial: Using a Coverstitch Machine and Knit Tips – Whitney at TomKat Stitchery
- Video – February Sew My Style Lookbook – Whitney at TomKat Stitchery
- Blog – Falling in Love with the Givre Top and Dress – Simone at Intensely Distracted
- Blog – Sew my style February: Sheona versions and fabric choices – Claire at Belle Citadel
- Blog – 3 Easy Ways to Do Round Back Adjustments on Knits – me!

The dress is beautiful! I love how you matched the lace to create a really cool Chevron effect. Looking at the line drawing on the package, I would never consider the dress as something I would like, but yours looks amazing, so I might give it a try.
Thank you, Paula! I honestly didn’t consider it either, I was just going to make a regular tee…and then it kind of hit me one day. Amazing what you can do with a pattern, huh?