The Elliot Sweater from Helen’s Closet is a great basic pattern. It’s a boxy raglan sleeve top with either a regular neckband or cowl/turtleneck option. It has such great potential.
It just wasn’t great ON me.
But don’t worry. I won’t let that color my review of the pattern.
Plus I think I can fix it!
I hope I can fix it. I really love this color on me.
Pattern Description

From Helen’s Closet:
The Elliot Sweater is your go-to cozy layer for everyday wear. Dress it up with dark denim and boots, or keep it casual over leggings and sneakers. View A has a stylish high-low hem with a side slit that provides comfort around the hips. View B is slightly cropped, perfect for pairing with high-waisted pants and skirts. View C of Elliot makes a great, everyday t-shirt. All views feature a raglan sleeve and three neck options are provided: an extra tall version that can be scrunched down or folded over, a medium height version, and a classic knit band.
I made Version A with the split hem and tall neck band.
Size Chart
While Helen is working to expand her size chart, Elliot isn’t yet available in the new sizing. Though when she does update it, anyone who owns the original pattern will receive an update.
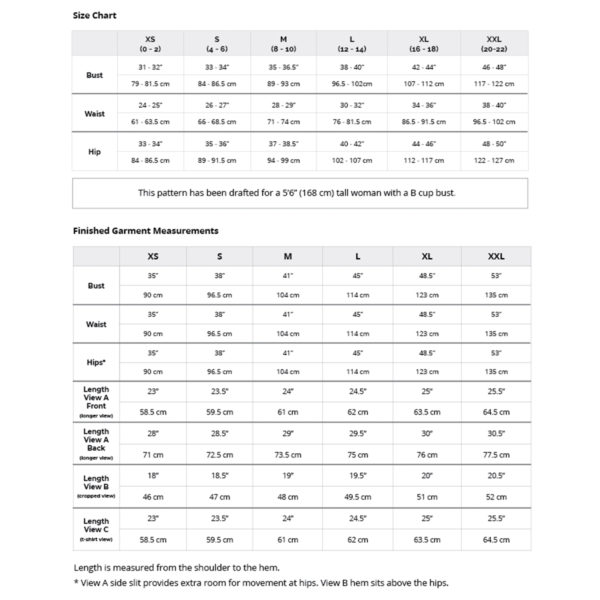
Thankfully Helen includes finished garment measurements! You can see the pattern is the very definition of “boxy” as all the measurements from bust to hip are the same.
It’s a literal box with sleeves! Raglan sleeves though!
I made the size XL with a full bust adjustment.
Fabric
The recommended fabric is:
- Sweater knits with at least 20% stretch widthwise and 10% stretch lengthwise.
- Views A and B work best in a medium to heavy weight sweater knit, rib knit, or french terry. Ponte and scuba knits can be used but will result in a more structured final garment. A drapey or slinky fabric will result in a relaxed neck.
- View C works best in a light to medium weight jersey or ITY knit.
I found this beautiful teal double knit for $4 a yard at my local fabric store. It’s called Chic Fabric Remnants and I could walk there if I wanted! I knew it would be more structured than a sweater knit, but I was too in love with the color to care. (Mistake #1.)
PDF Criteria
Here is how the PDF stacks up:
- Layered sizes: yes
- Colored lines by size: no
- No trim pattern: no
- Prints to edge of paper: no
- Print layout included: yes, page 6 of instructions
- A0 available: yes
Like all other Helen’s Closet patterns I’ve made, her pattern layout also lets you know which pages you can exclude for the version you choose. (For reference, I’ve posted about the York and Suki.)
Pattern Instructions
As always, Helen’s Closet instructions are straightforward and illustrated with simple line drawings for each step. There are even beginner tips sprinkled throughout. There is an entire section in the instructions for people new to sewing with knits, too.
Sometimes Helen has a sew along on her blog, but this pattern is so simple it’s really not necessary. You can have it done in just a few hours.
Pattern Notions
None required, besides thread.
Pattern Adjustments
This one was a doozy for me. I thought I would need a high round back adjustment, which I had never done on a raglan sleeve. So I learned something new…and then realized I didn’t need it! (Mistake #2.)
It looks like this though:
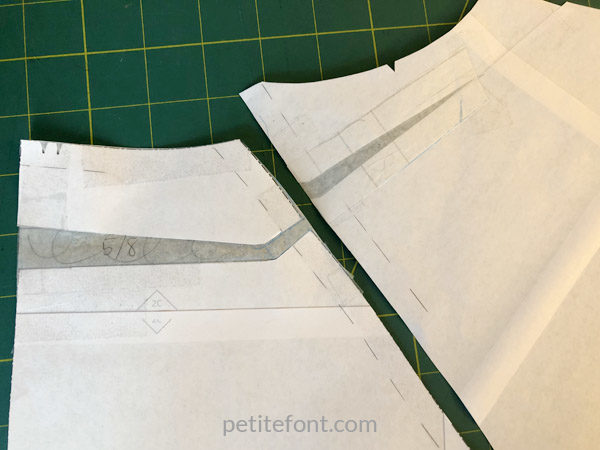
You have to wrap the adjustment around the collar into the sleeve. Very interesting.
Anyway, I didn’t need it as evidenced by this:
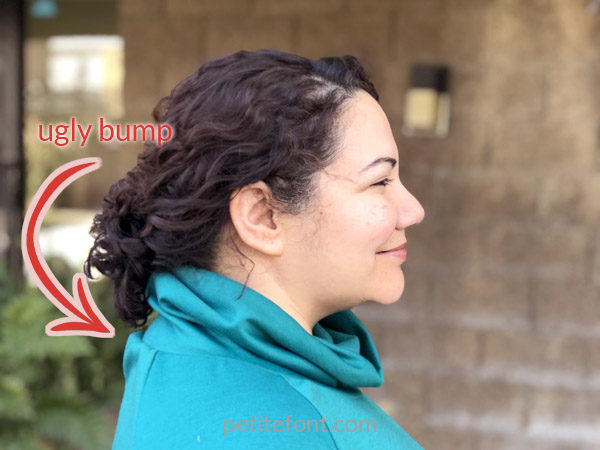
I also did my typical 2″ (5 cm) full bust adjustment and shortened the length. Since this has straight seams from the bust to the hem, I knew I could simply take it off the bottom once I’d sewn it together.
My big adjustment was on the split hem. Where it originally hit on my body is right where my tummy roll is. That’s not a part of me I like to show off, plus it felt drafty! So I lowered it down to where I felt comfortable, which is right at my hip. It was about 4″ (10.2 cm) lower total. I still got the high-low effect (albeit a little more subtlely), but no draft.
My hand is right about where the original split would have started:
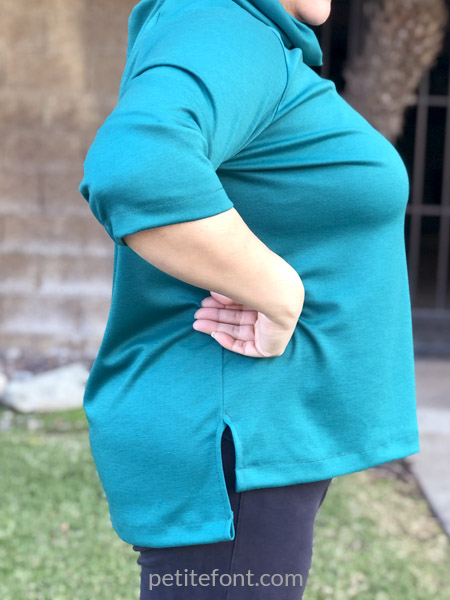
I then shortened 2″ (5 cm) from there.
Final Thoughts
I hate how this looks on me. I love the color, and if I’d made it in a more fluid knit it would be awesome. But a structured knit was all wrong for my body. This is the second boxy top I made this year and I’m not going to wear either one. Clearly boxy tops are not my thing, and now I get it.
I GET IT!
Even though my hair would hide that bump in the back, it still looks messy, so I have to fix it. I think I’ll take the tall band off and try the classic knit band. We’ll see if that helps with the bump.
This obviously also needed a swayback adjustment. I don’t know why I forget to do those! Also clearly the FBA didn’t add enough length at center front. So I have a myriad of issues to contend with here.
But the pattern itself is great! I love that there are 3 separate bodice options, 2 sleeve options, and 3 neckband options. That’s a good deal for $14. Though I will admit I bought this when it was on sale for 20% off. I love a sale!
And I’m going to try it again. Next time I’ll use a sweater knit with some drape and I’m sure it will work out much better.
This is not the end!
Have you made this pattern? Let me know in the comments how it worked out for you. What kind of fabric did you use?




Been there, done that. 🙁 I would have loved to see a “full frontal” photo of you wearing it though, to see why you dislike the fit. Please don’t be shy, you’re among friends you know 🙂
LOL! Well, I’m glad I’m among friends, thank you, Yvette. The benefit of being the blogger means I get to decide how many awful pictures of myself I’ll allow on the internet and this just isn’t going to be one of them. However, stay tuned for a future “I fixed it!” post where you should be able to see a before and after!
I’m short bodied and full busted (UK30F) and can’t wear boxy tops either. I’ve tried dartless FBAs, and unless its for a really stretchy top pulled tight with lots of negative ease it just doesn’t put the extra fabric where I need it. If you added a dart with a bigger FBA on this design it would sit better over the bust and not bag out over the tummy. While dartless FBA may work if it is not too big, I don’t think it works so well for larger cup sizes. I added a darted FBA to a tshirt after… Read more »
Sounds like a really great idea!
I too love the color on you. Yes you need more fba but you can still wear it. Do you pin pattern pieces together to get an idea of fit first?
I always do, if only to find my bust point. But fit is still one of those things I’m working my way through. What this did teach me is that boxy tops just don’t work for me. Now I know!